✅ We last checked all the steps in this guide on iPhone 8 with 17.2.1 installed. The latest iOS version is 17.2.1.
Whether you’re trying to conserve your iPhone’s dying battery or struggling to get a good night’s sleep, turning off your phone is probably the best way to approach the situation. Unfortunately, iPhone has no direct feature that lets it schedule itself to shut down during the course of the night. However, it does contain various settings — which I’ll be discussing — allowing you to sleep undisturbed at night.
How To Make iPhone Automatically Turn Off at a Certain Time
iPhone isn’t programmed to contain an option that lets you automatically turn it off at a scheduled time. However, it does offer plenty of features that will curtail any disturbance through the night and save your battery from draining.
I have listed some of the easiest ways to program your iPhone to turn off or dial down its screen colours and functions automatically at any given time.
Turn on “Night Shift”
Night Shift is a helpful iPhone feature if your eyes feel strained while looking at your iPhone at night. It reduces the iPhone colours to a warmer hue, making the display more soothing for your eyes. Here’s how you can enable Night Shift automatically:
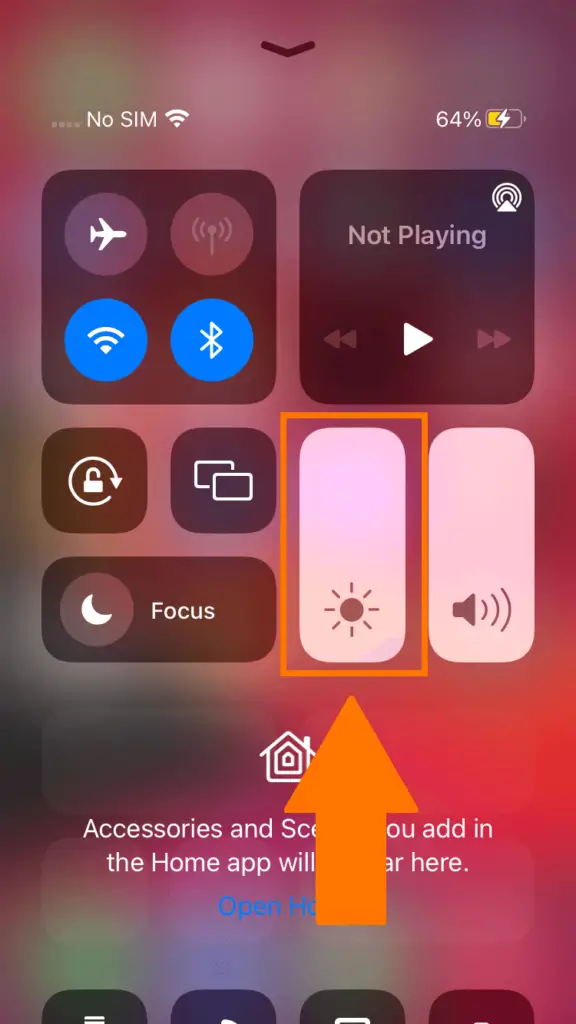
Step 1: Open Control Center.
Step 2: Tap and hold the Brightness Bar.
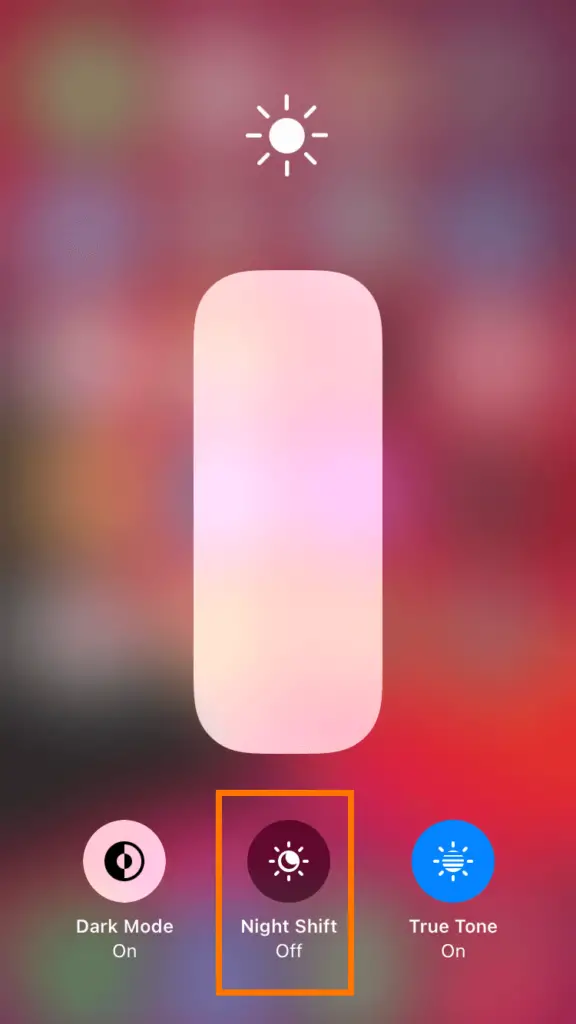
Step 3: Tap on Night Shift to turn it on.
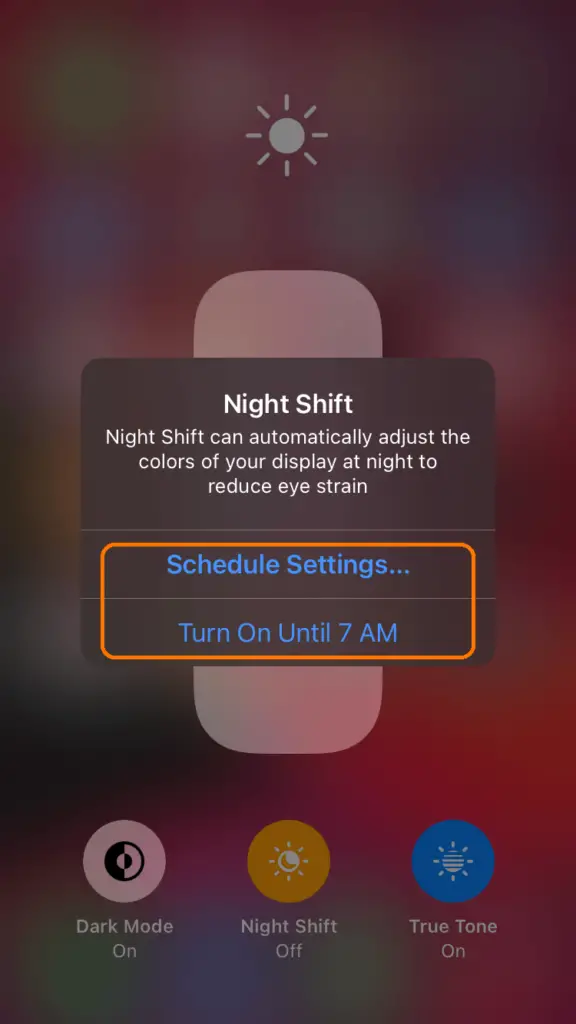
Similarly, you can automatically schedule the Night Mode to turn on/off at your desired time. To do this, follow the steps.
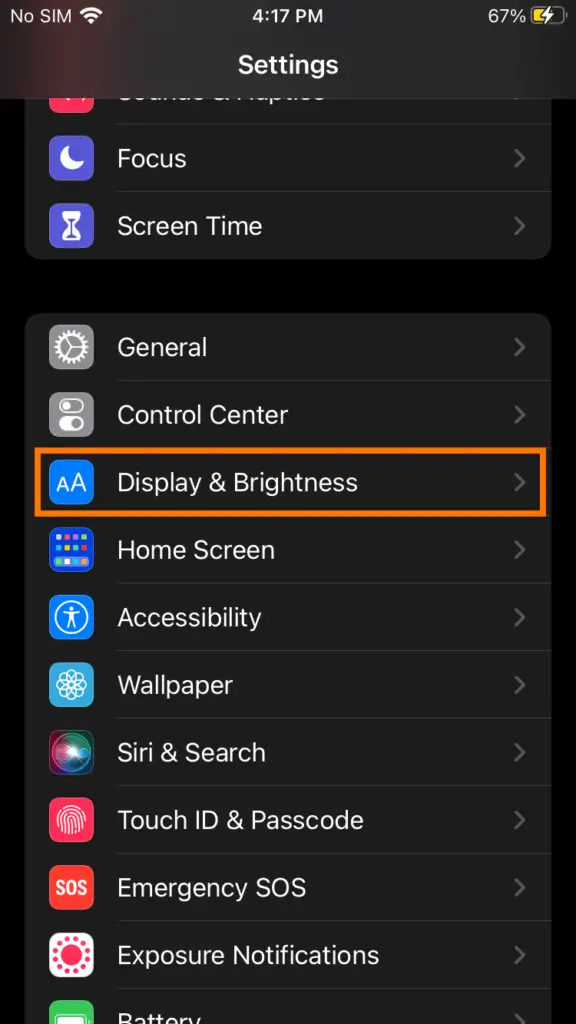
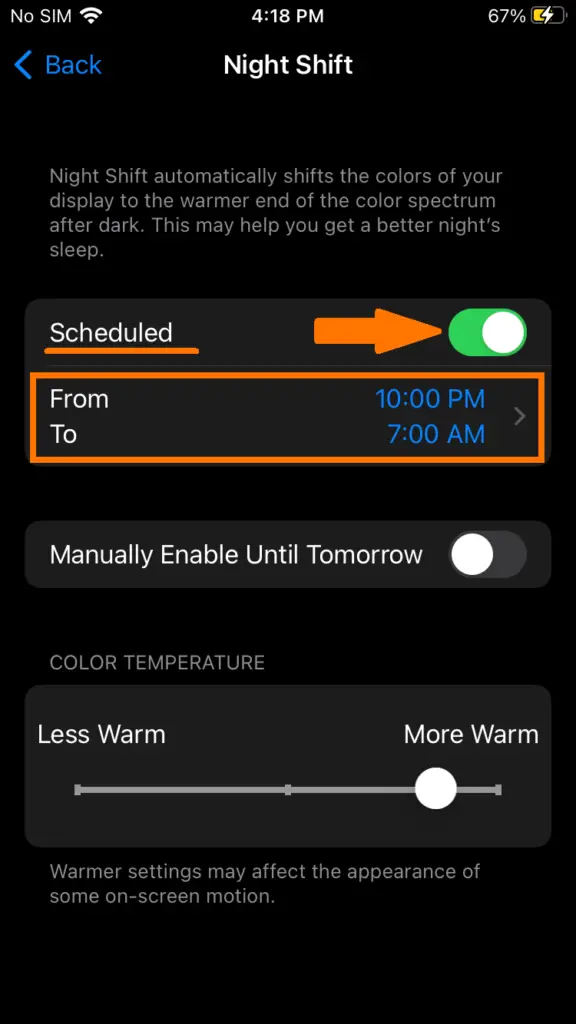
Step 1: Open Settings → Display & Brightness → Night Shift
Step 2: Here, you can turn on Scheduled by toggling on the switch and schedule the time you want your Night Shift to be enabled.

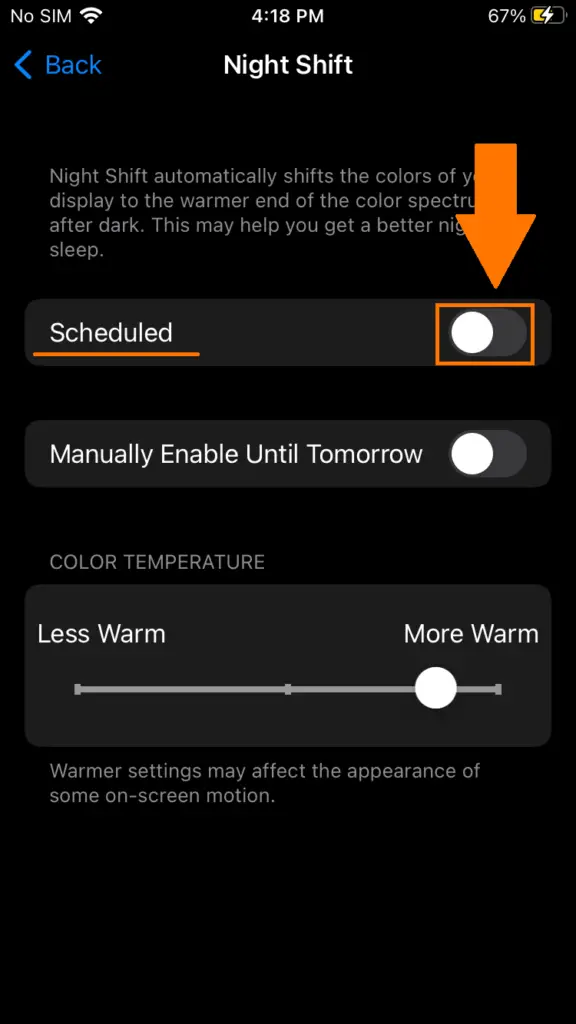
You can also turn this option on manually for a limited time and control your display’s warmth.
Enable “Sleep Mode”
Sleep Mode suspends all of your incoming calls and notifications to prevent you from any unwanted distractions while you’re resting. Enabling the option also simplifies your lock screen, so you’re not pulled back into the phone. To turn Sleep Mode on, follow these easy steps.
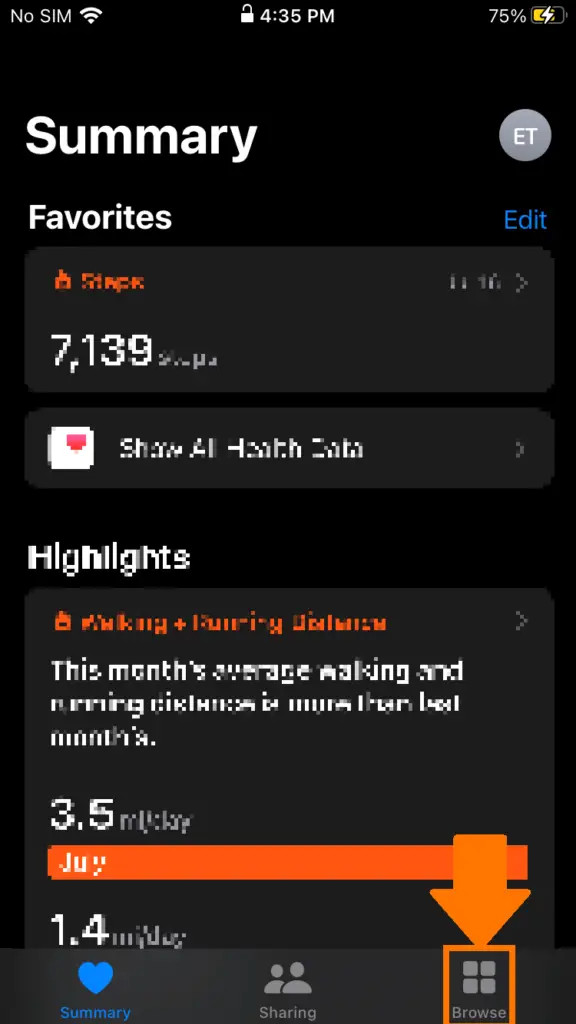
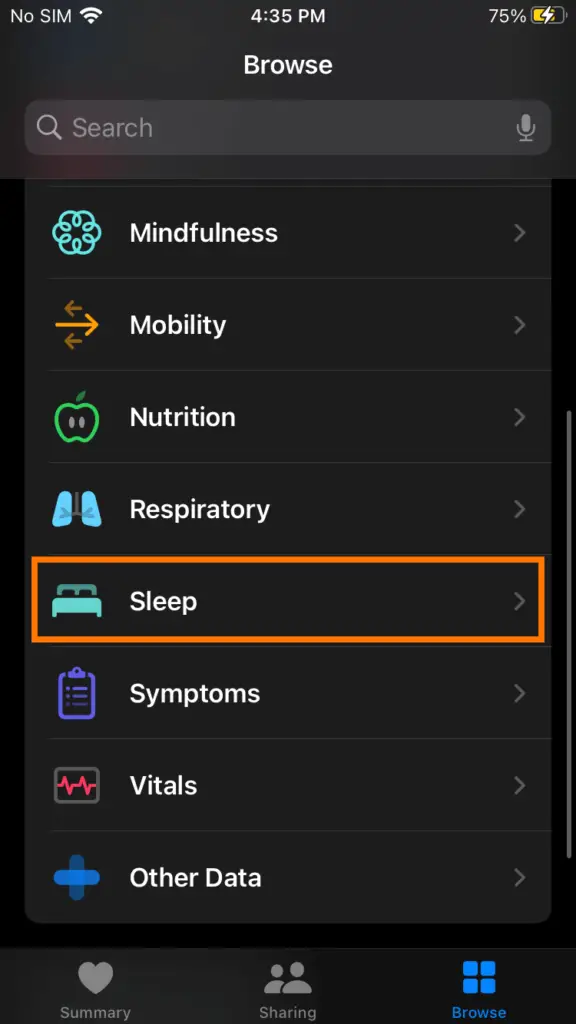
Step 1: Launch the Health app from your screen and select the Browse tab from the bottom.
Step 2: Tap on Sleep.
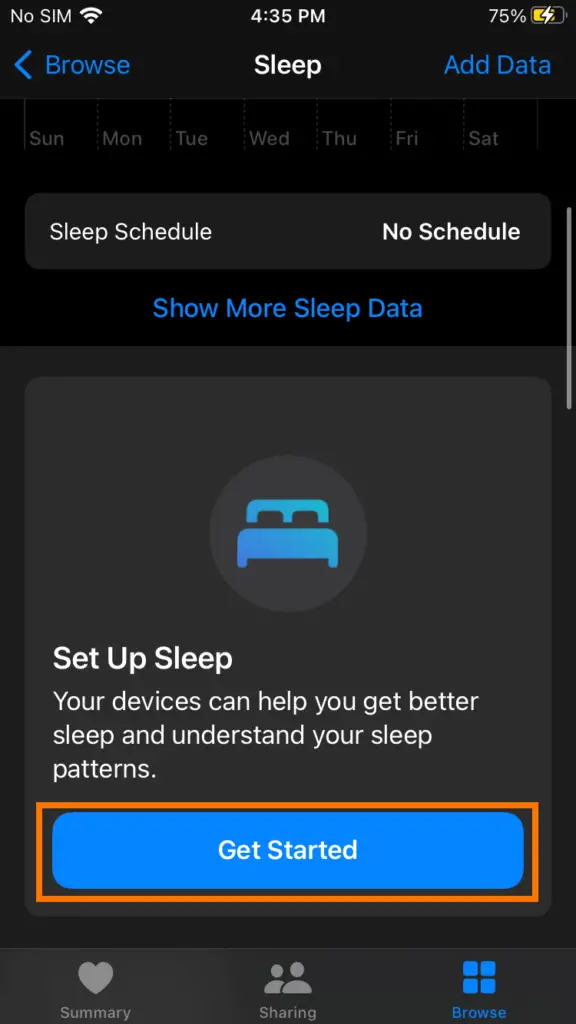
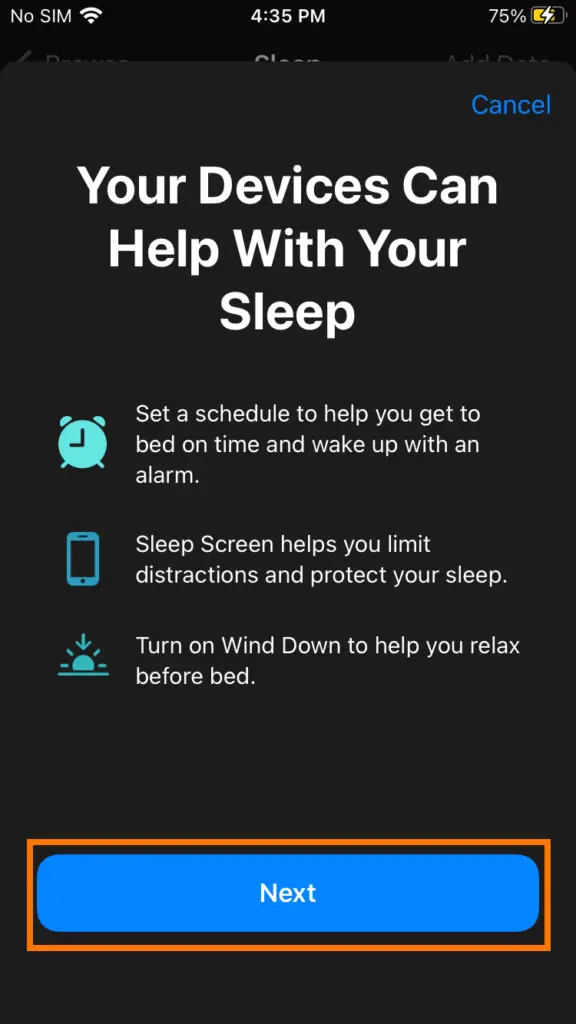
Step 3: Click the large ‘Get Started’ button and press Next.
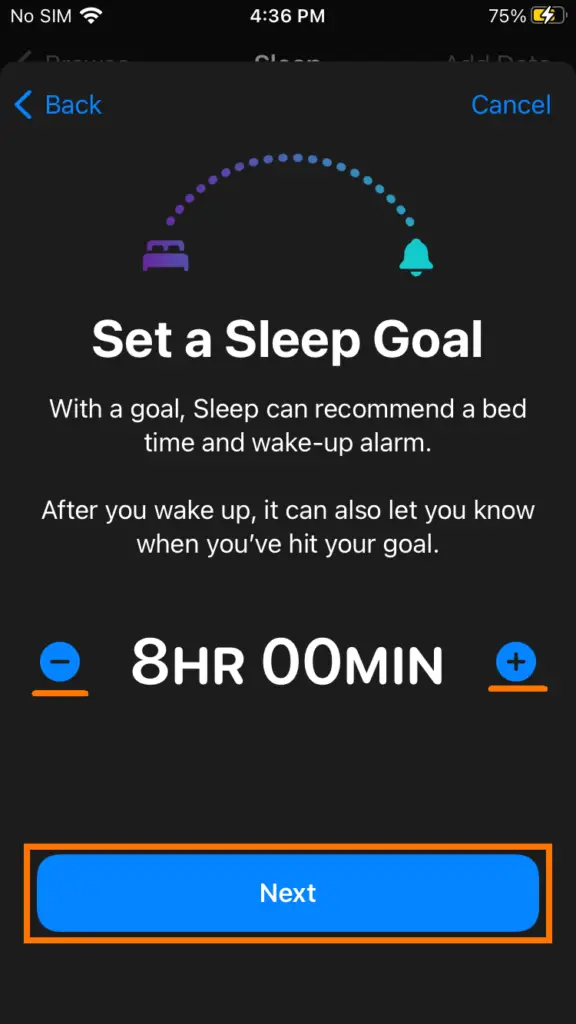
Step 4: Choose how many hours of sleep you want each night. Then press Next.
Step 5: Set the number of hours you want to sleep for with the “–” and “+” icons and press NEXT
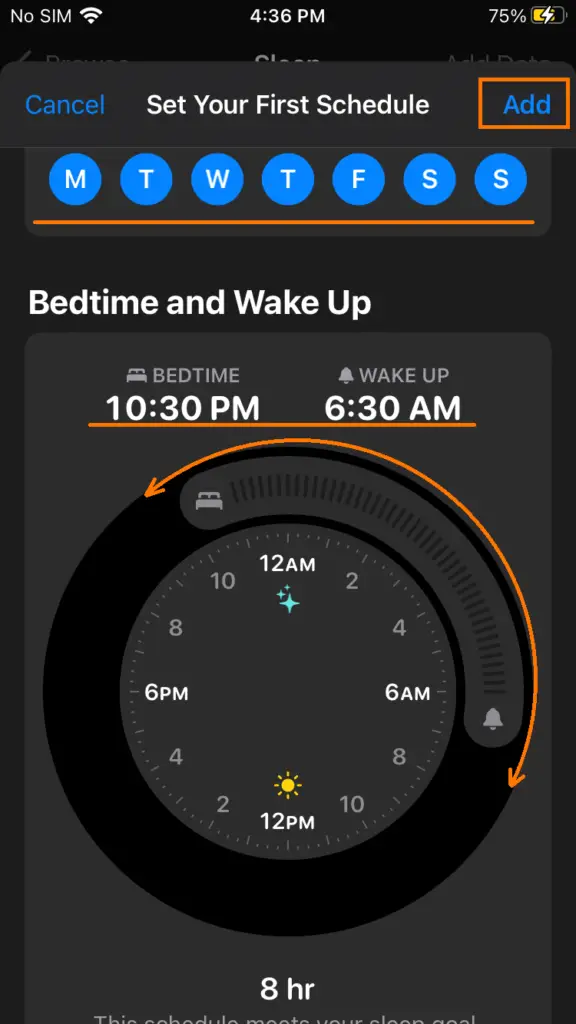
Step 6: Set the slider to your preferred bedtime routine. You can select different days of the week you want Sleep Mode to work on and add specific schedules for each day.
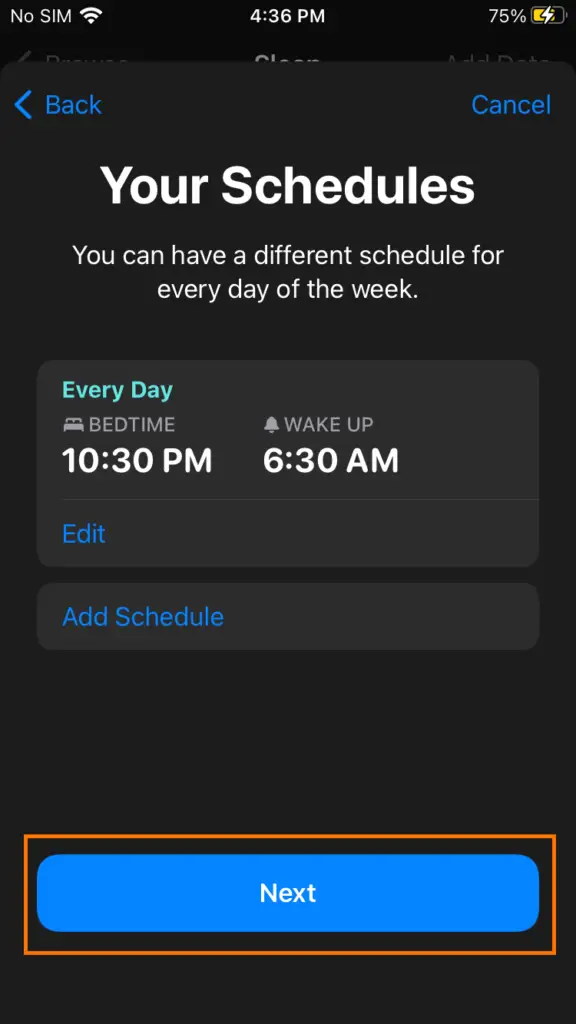
Step 7: Click the Add button on the top right to continue. Then tap Next.
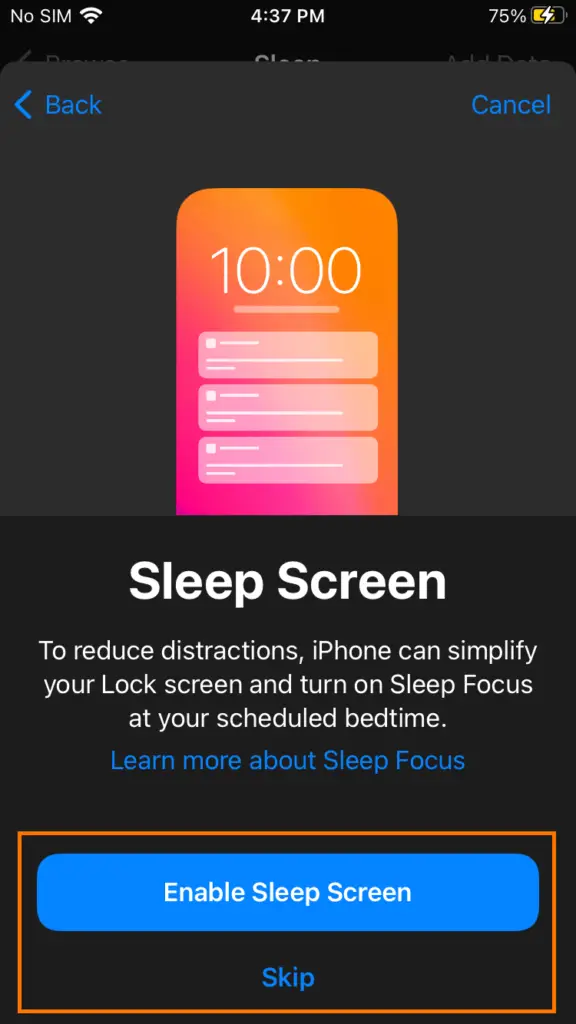
Step 8: Press Enable Sleep Screen or tap Skip to continue.
Enable Wind Down
The Wind Down feature is an extension of Sleep Mode, letting you enable the sleep screen before its scheduled time, preventing any notifications from popping up on your lock screen, and making it simpler and void of distractions. I’ll be showing you a couple of methods to enable the setting.
The first way is the continuation of enabling sleep mode. After you’ve reached Step 7, follow these steps.
Step 8: Press the large Enable Wind Down button. Simply press Skip if you don’t want to set this option up.
Step 9: Tap Set Up Shortcuts if you want shortcuts on your home screen. Otherwise, just press Skip.
Alternatively, if you don’t want to head down the long road of Sleep Mode, here’s a shorter method:
Step 1: Open the Health app and select the Browse tab from the bottom right.
Step 2: Scroll down and tap on Sleep.
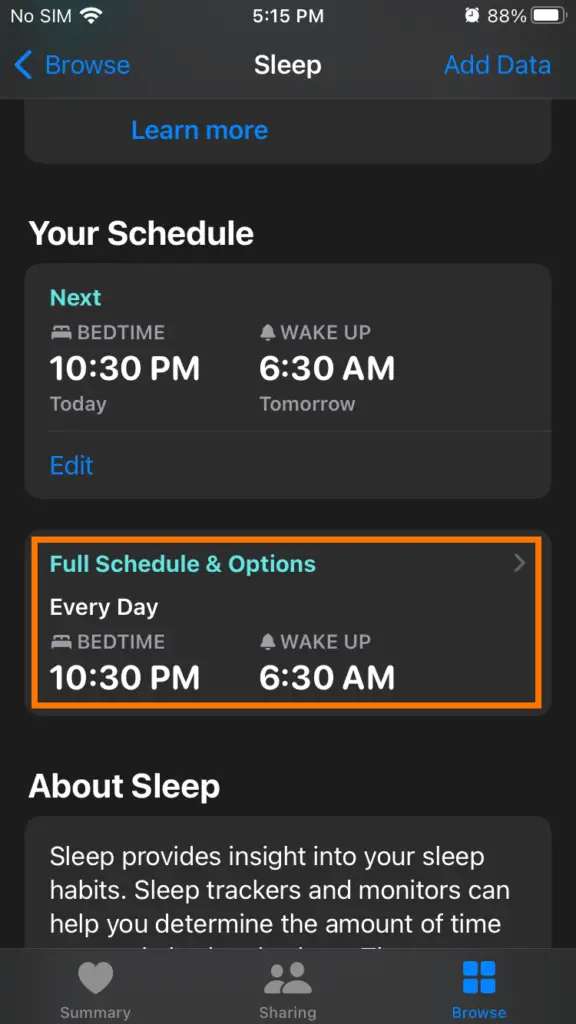
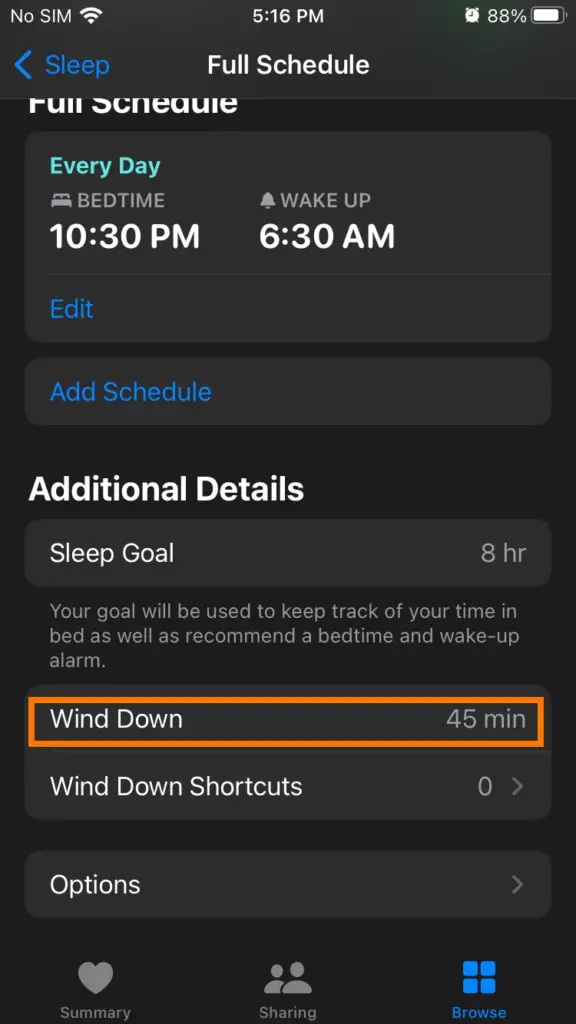
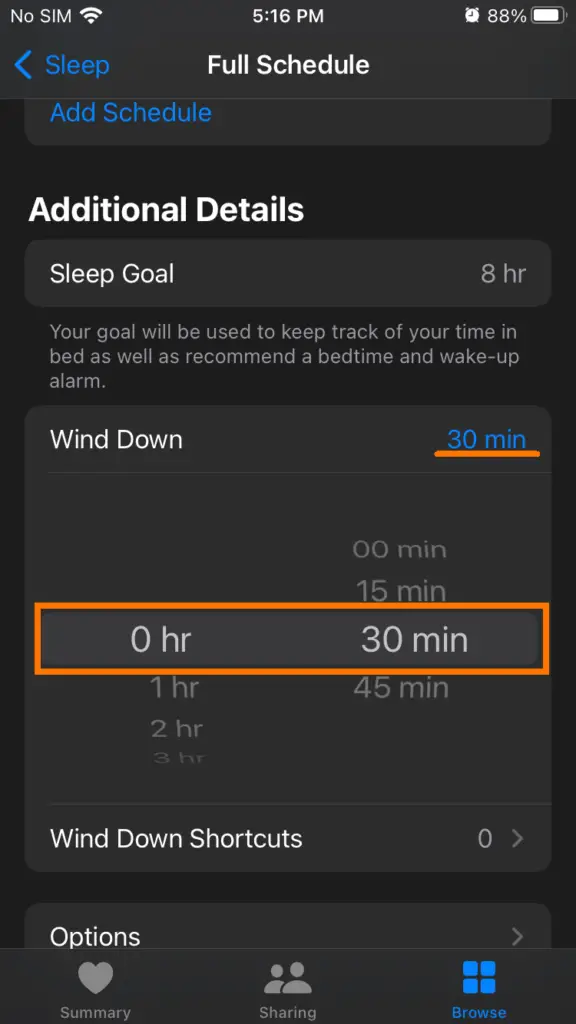
Step 3: Scroll down again and select the Full Schedule & Options.
Step 4: Under the Additional Details tab, tap on the Wind Down button and set the time you want the Sleep Down Mode to be activated before your scheduled bedtime routine.
Turn on “Do Not Disturb”
The Do Not Disturb feature, when enabled, ensures that your notifications, incoming calls, and alerts are silenced, letting you rest undisturbed. Turning on the feature is pretty straightforward, here’s what you need to do:
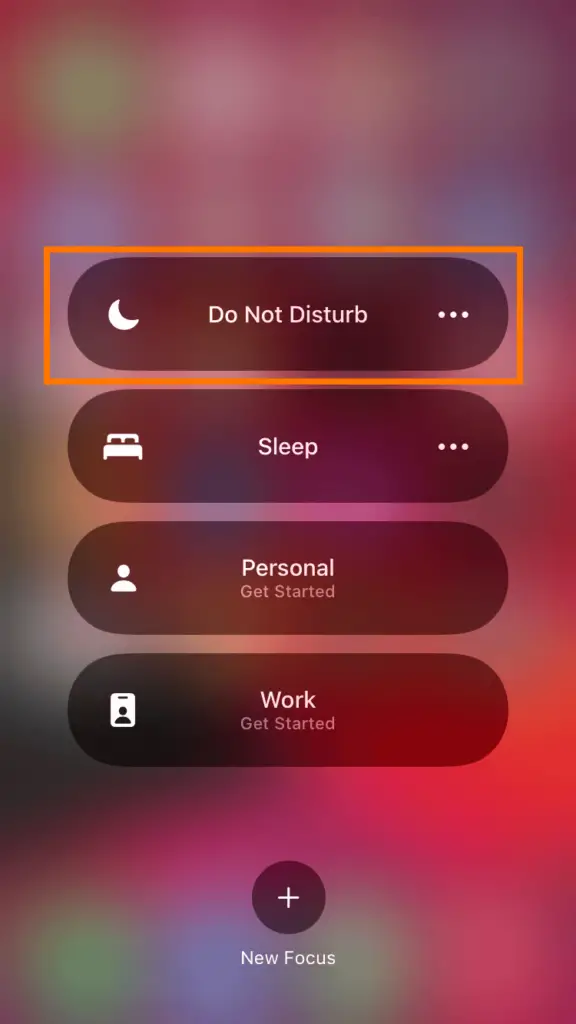
Step 1: Open the Control Center.
Step 2: Hold the Focus option.
Step 3: Tap the Do Not Disturb button to turn it on.
If you want to schedule how long Do Not Disturb should last, click on the three dots on the far right and set the time according to your preference.
You can also click the Settings tab to customize the feature further.
Schedule Time Away From Screens
The Screen Time feature allows you to block off notifications and apps for scheduled periods, preventing you from distractions while you’re trying to rest or work.
Here’s how you can maneuver through your iPhone’s settings to turn on Screen Time:
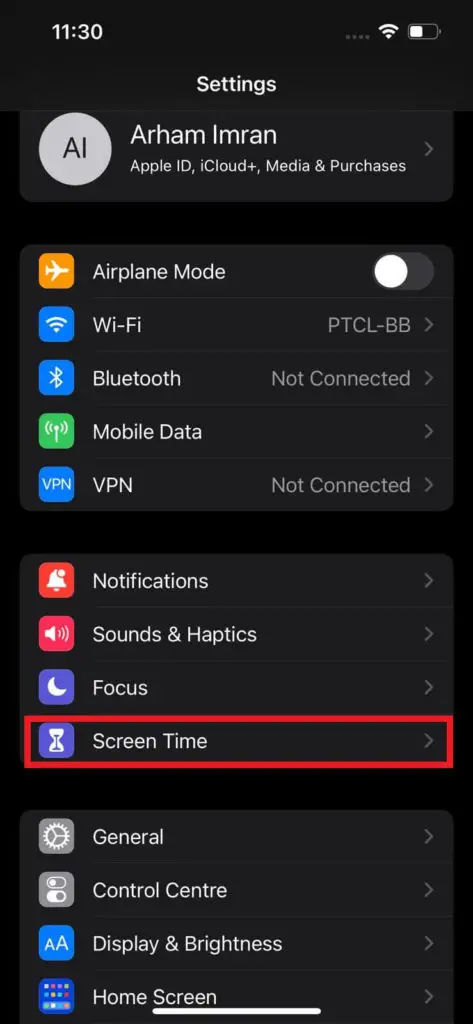
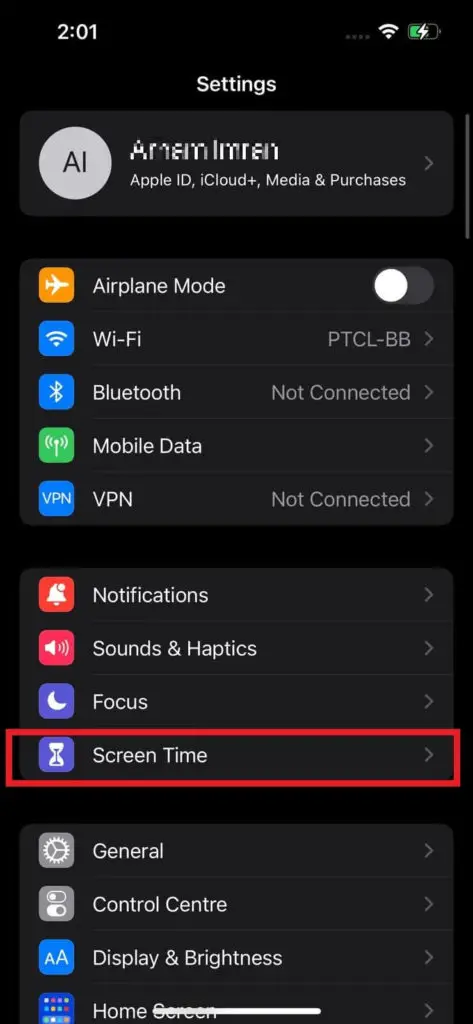
Step 1: Go to Settings → Screen Time.
Step 2: Turn on Screen Time and follow the upcoming prompts.
Step 3: Once set up, tap on Downtime and enable it.


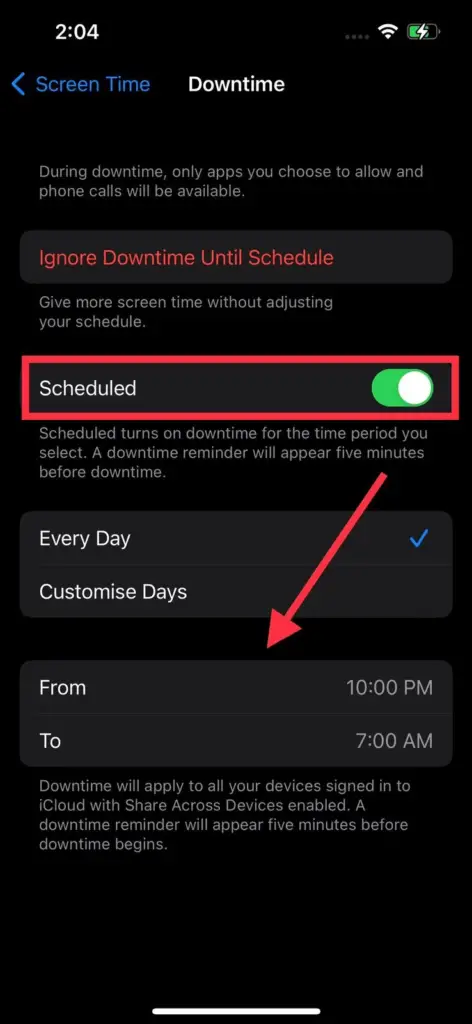
After that, you can select the days you want to schedule this feature by setting the starting and ending times.
Turn On “Downtime on Demand”
If Downtime is enabled on your iPhone, only selected apps will be able to send push notifications. Similarly, only contacts you’ve selected to allow communication while Downtime is enabled will be able to call you.
The best part about activating Downtime is that you always get a five-minute heads-up before push notifications are disabled from selected apps. Here’s how you can turn on the feature:
Step 1: Go to Settings → Screen Time.
Step 2: Tap on Downtime.
You can then enable the Turn On Downtime Until Tomorrow option or Turn On Downtime Until Schedule (you will have to set a schedule first for the latter).
Set Limits for App Use
The Add Limit feature lets you set a timer on how long you can use a particular application in a day. Once the time you have set runs out, you cannot use that app for the rest of the day.
This option comes in pretty handy, especially for individuals who’re spending way too much time procrastinating on social media.
Here’s how you can enable the feature and control your app usage:
Step 1: Go to Settings → Screen Time (Set Screen Time to on if you haven’t already).
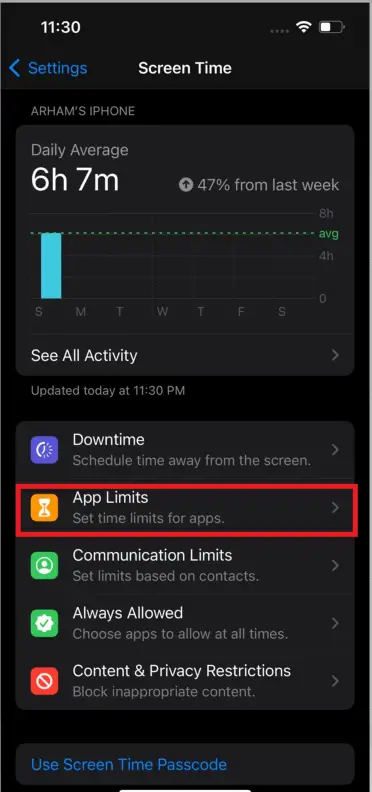
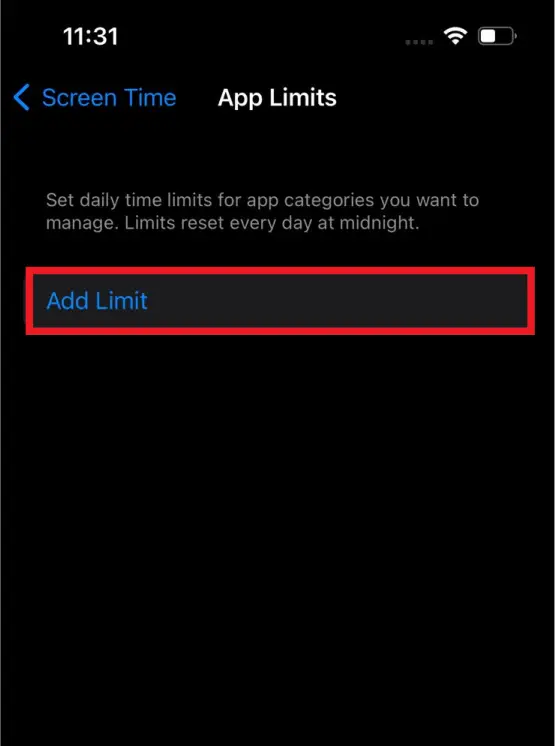
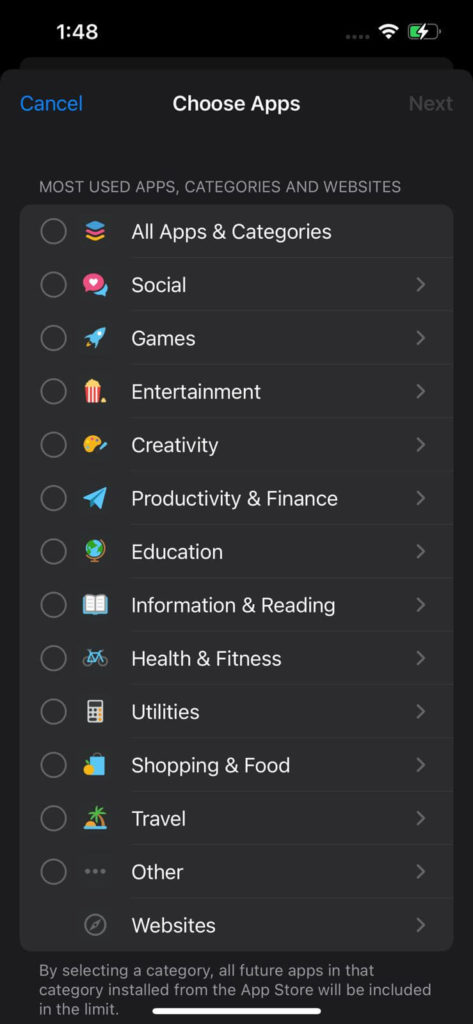
Step 2: Click on App Limits, then tap Add Limit on the next screen.
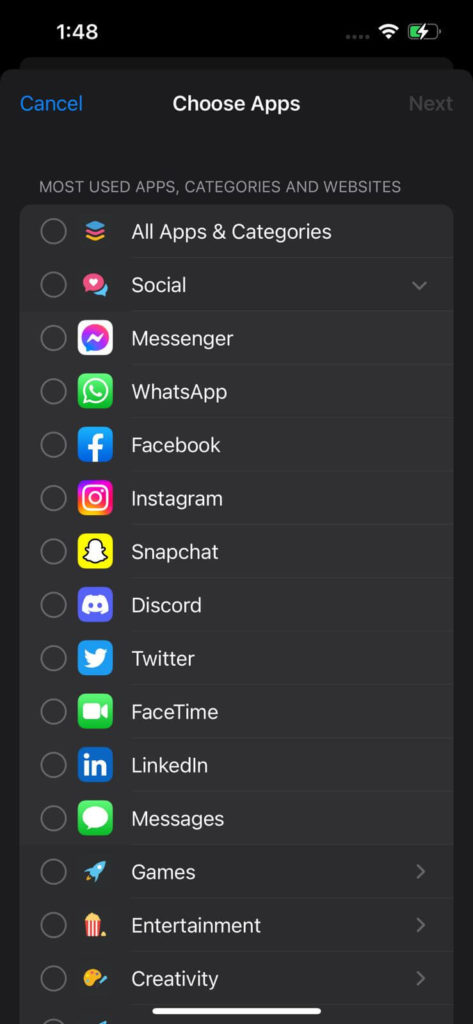
Step 3: Next, select a category and choose the app you want to put a limit on.
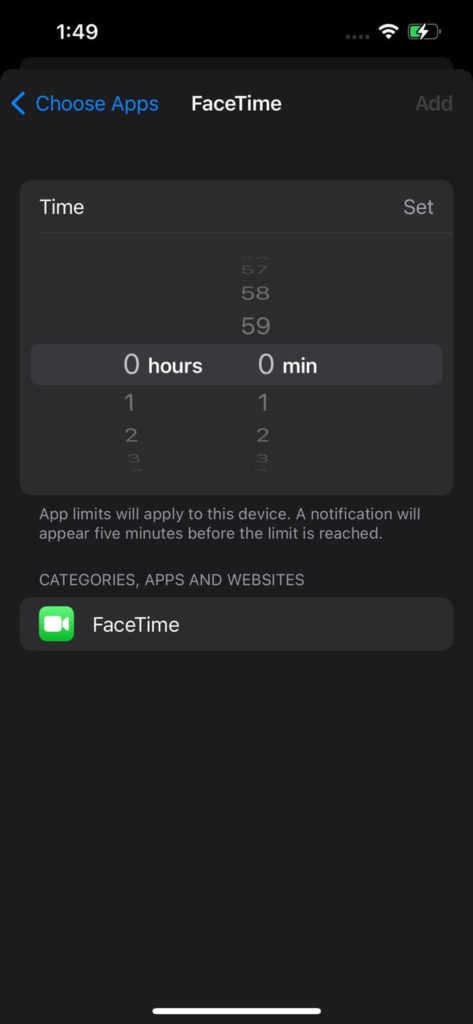
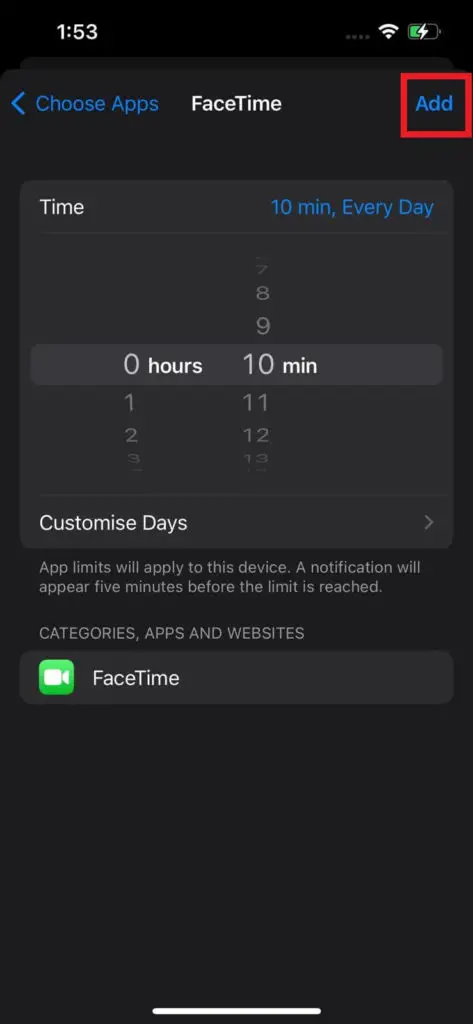
Step 4: Finally, choose the time you prefer to spend on that app in a day. You can also select/deselect days on which to activate the limit, for example, leaving your weekends free to use the app as long as you want.
Step 5: Once you’re done, tap on Add on the top right.
If you want to add different limits on different applications, follow Step 2 to Step 5 again.
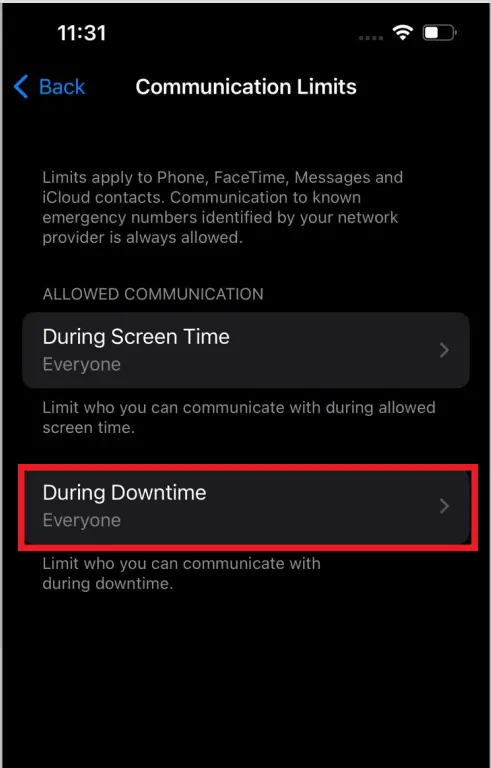
Set “Communication Limits”
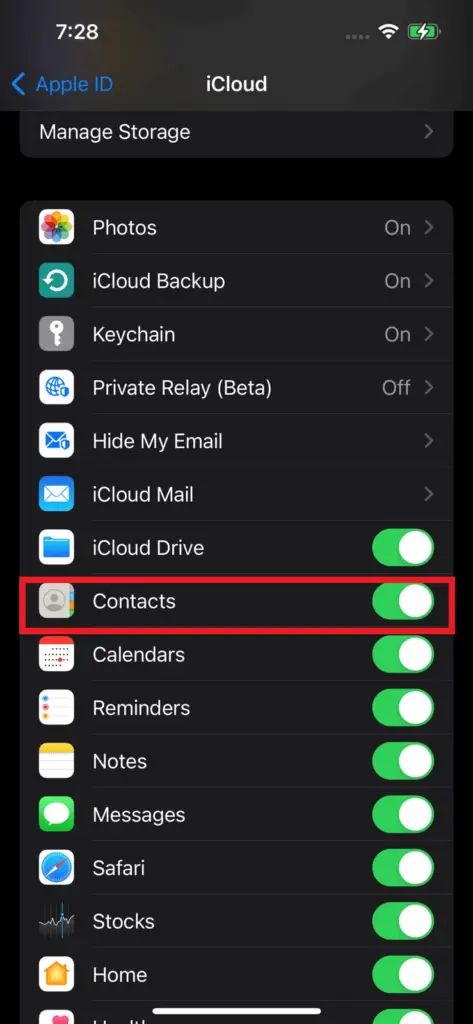
Through the Communication Limits feature, you can decide who can contact you during Downtime to get a break from calls and messages. Yes, this includes FaceTime as well. Before you proceed on to find out how to enable the feature, make sure your iCloud contacts are turned on.
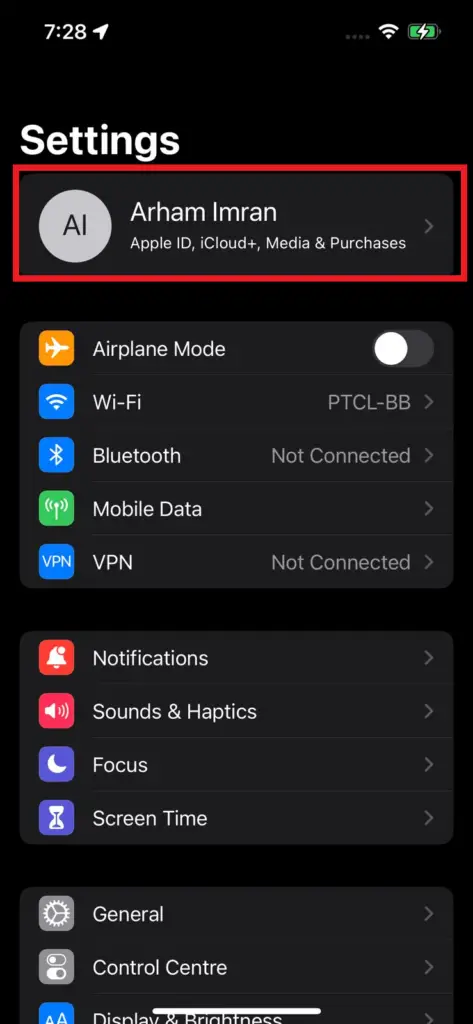
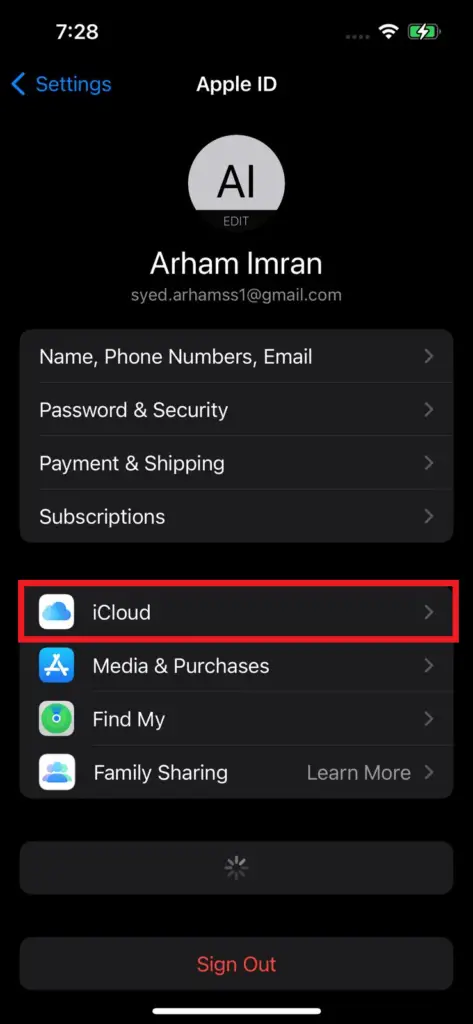
Step 1: Go to Settings →[Your Name] → iCloud.
Step 2: tap on Contacts to turn them green.
Step 3: Once your iCloud contacts are enabled, go back to the Settings main page and choose Screen Time.
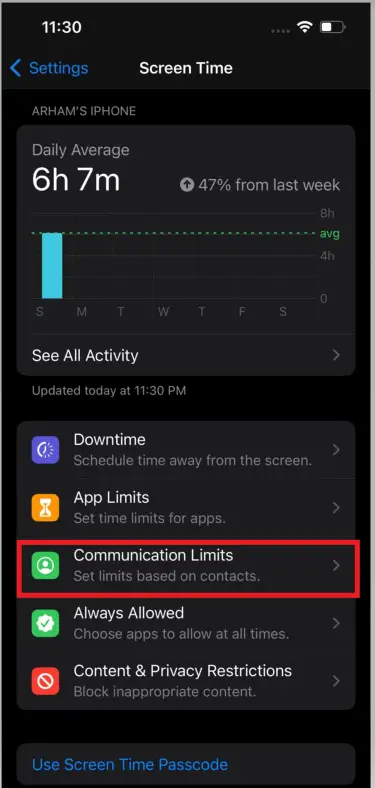
Step 4: Then tap Communication Limits.

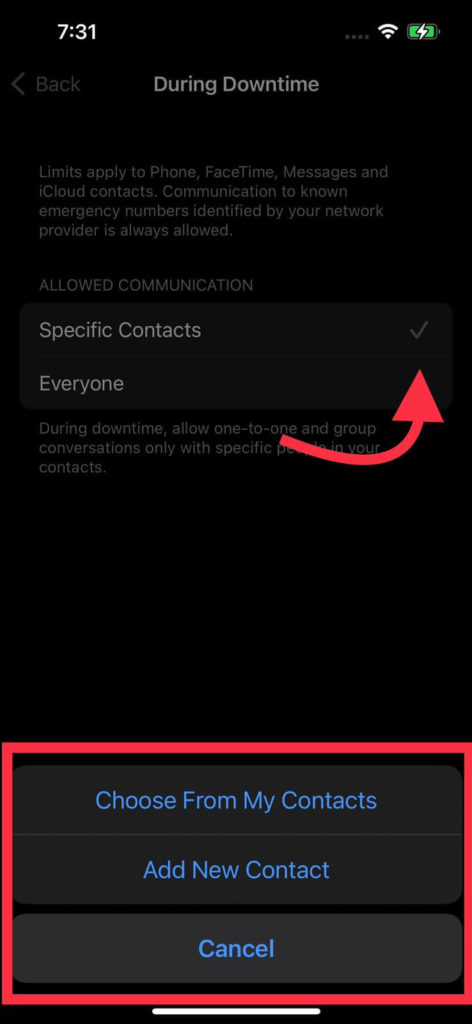
Step 5: Enter your Screen Time passcode if prompted. Then click on During Downtime.
Step 6: To decide who can reach you, tap Specific Contacts and select Choose From My Contacts to add them to the list.
Step 7: When you’re finished, tap Done.
Make Sure To Choose Apps and Contacts You Want To Allow at All Times
Although I recommend following all the methods I mentioned above for a healthy sleeping schedule, it is vital to specify apps/contacts that can bypass all these features to communicate with your iPhone 24/7 in case of an emergency.
Here’s how you can set up priority contacts:
Step 1: Go to Settings → Screen Time.
Step 2: Tap on Always Allowed.
Step 3: You will see a [+] or [-] next to the applications, allowing you to add or remove them from the Allowed Apps list.
Step 4: You can also head into Contacts and choose whichever number you wish to be able to reach you at all times.
How To Prevent Access To Certain Apps During a Certain Time on an iPhone?
The Content And Privacy Restriction feature on your iPhone lets you take control of the apps on your iPhone, blocking any inappropriate content, restricting in-app purchases, downloads, and privacy. This is pretty helpful if you have children at home who have a tendency of being adventurous with iPhone apps.
To turn on the Content And Privacy Restriction setting, here’s what you’ll need to do:
Step 1: Go to Settings → Screen Time.
Step 2: Next, select Content And Privacy Restriction and turn it on.
Step 3: From there, you can control your iTunes, in-app purchases, restrict the content in an application, disable an application, and even tinker with various privacy options like hiding your location and Bluetooth.
Bottom Line
Whether you’re procrastinating a lot or getting distracted while trying to sleep, using the above features will definitely help you out. Plus, you’ll also be able to conserve your iPhone’s battery while its features are toned down during Sleep Mode.
As always, we hope you enjoyed this article. If you’re still left with any questions, let me know in the comments below and I’ll try to respond as soon as possible!