
✅ We last checked all the steps in this guide on iPhone 12 with 17.2.1 installed. The latest iOS version is 17.2.1.
You might take a screenshot to save what’s happening on your iPhone’s screen, but screen recording your iPhone is your best bet for capturing a sequence of events.
Fortunately, screen recording your iPhone 12 is pretty straightforward. All you have to do is add the screen recording tool to your iPhone 12’s control centre and tap the icon to begin the recording.
The tricky part for new iPhone users is to navigate through the options to add the screen recording tool to your control centre, but don’t worry! We’ll guide you through each step of the way.
How to Record Your Screen on iPhone 12
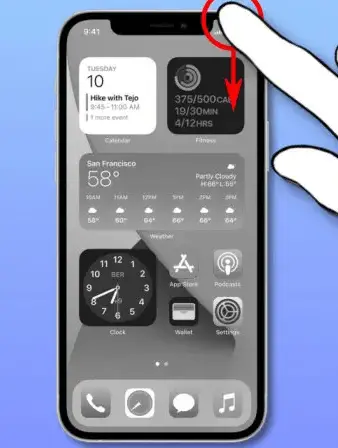
The first thing you need to do is check if the screen recording option is already present in your Control Center or not.
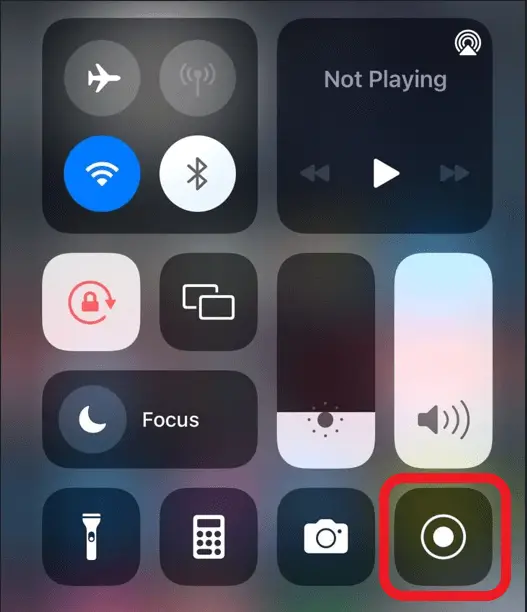
Open the control centre and locate the screen recording option. If the icon is present, tap on it, and a timer will appear, which denotes the number of seconds left until the screen starts recording.
If the screen recording option isn’t already there, you first need to add it to your control centre.
Adding the Screen Recording Option in the Control Center
Here’s how you can navigate iPhone’s settings to add the screen recording option in the control center.
Step 1: To begin, open the Settings app from your home screen.
Step 2: Now select the Control Center tab.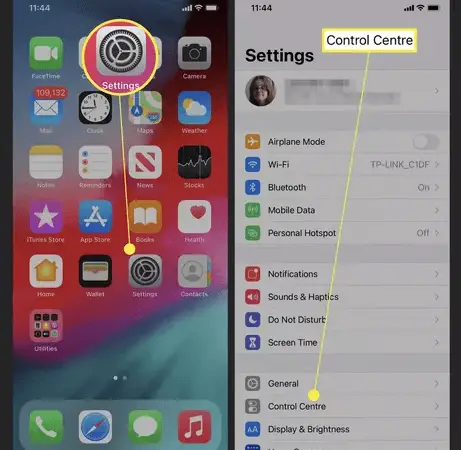
Step 3: Swipe down until you find the More Controls tab.
Step 4: In this tab, you’ll find the Screen Recording option, which you have to tap so that the symbol turns into a minus sign. (if it’s not already in your control centre, the screen recording tab will have a plus symbol alongside it). 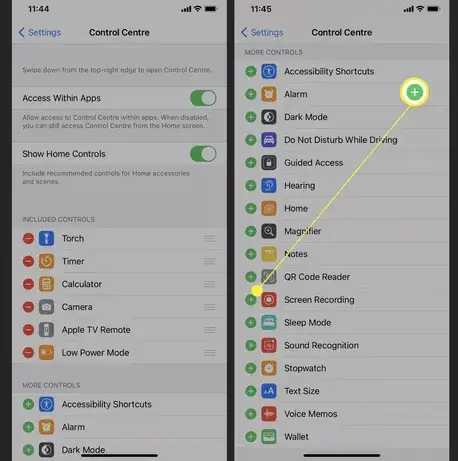
Once you’re done, the Screen Recording option will appear in the Included Controls section above.
You can arrange the shortcut icons by holding and dragging them into the desired sequence, which will be updated when you reopen the Control Center.
Once you’re done, you can open your Control Center again, and you’ll see the screen recording option. Simply tap on it and let the recording start!
Turn On/off the External Sound When Screen Recording on iPhone 12
The default iPhone screen recording only includes audio from the iOS and applications on your device. The standard settings don’t allow any external sounds, such as your voice, to enter the screen recording.
However, there is still a way to record your iPhone 12 screen alongside external audio. All you need to do is fidget around with the settings.
How To Turn On External Sound While Screen Recording
Follow these simple steps to record external audio alongside your iPhone’s screen when using the screen recording option.
Step 1: Launch the control and centre and locate the sound recording icon you just added.
Step 2: Press the icon for a few seconds to open the screen recording settings. 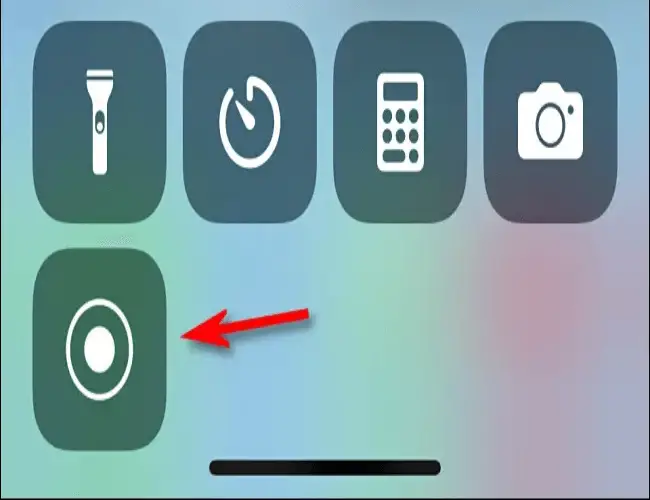
Step 3: At the bottom, you’ll find a microphone symbol. Tap the icon, and it’ll turn red, indicating that the microphone is now on for screen recordings. 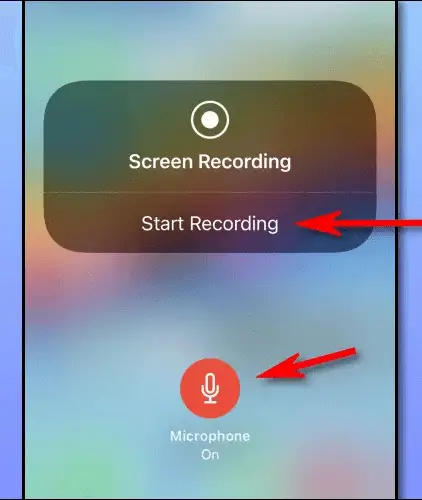
Step 4: You can now tap Start Recording to start the screen recording, with external sounds included!
To turn off the external sounds in your screen recording, you must tap the microphone button again. This time, the microphone button will become translucent, indicating that the mic is now off.
Where Are the Screen Recordings Saved on iPhone 12?
All your video recordings are automatically saved in your Photos app. You can also find the recording in a subfolder called Screen Recordings.
You can quickly access these recordings by going directly to the subfolder instead of trying to locate the video in your cluttered photo gallery.
Can You Edit Your Screen Recording on iPhone 12?
The chances are that your screen recordings will include some extra content at the beginning or finish. You probably don’t want to include the video of the Control Center disappearing or the part when you’re attempting to turn off the screen recording.
Fortunately, whether you want to trim the videos or resize them, you can do so from the Photos app on your iPhone 12.
How To Trim Screen Recordings on iPhone 12
Follow these simple steps to edit all your saved screen recordings:
Step 1: Open the Photos application from your home page.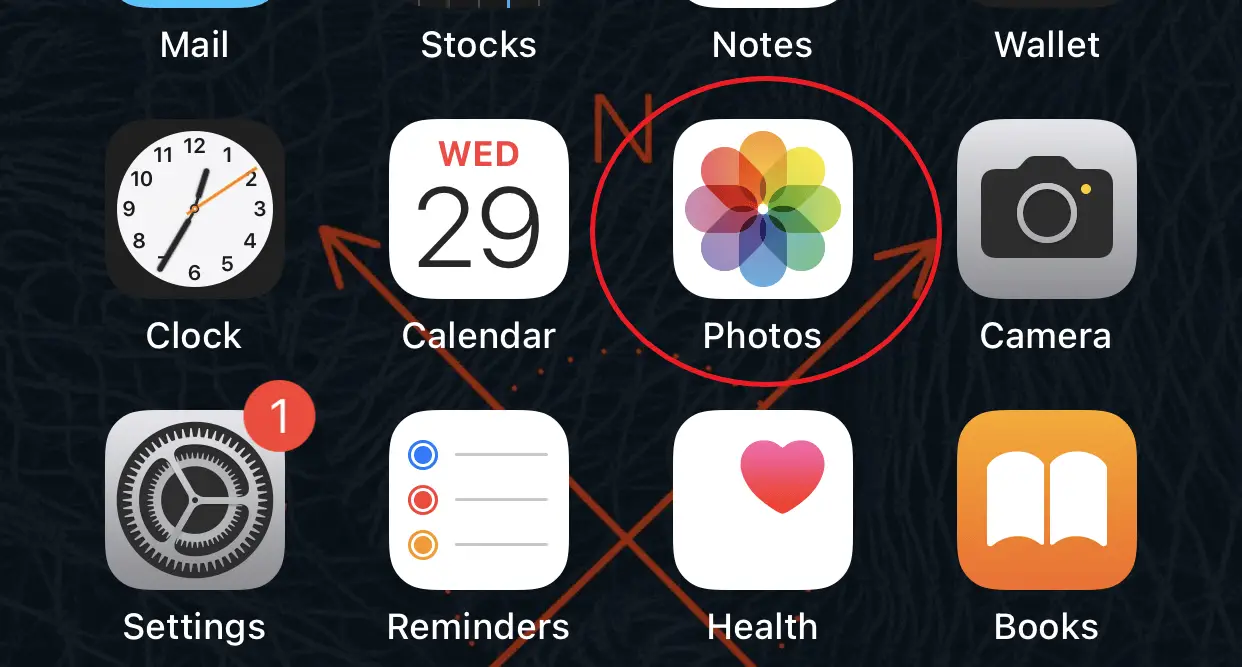
Step 2: Tap on the recording you want to edit and press the Edit option.
Step 3: At the lower part of the screen, you’ll find arrows that can trim the screen recording from the beginning or the end. 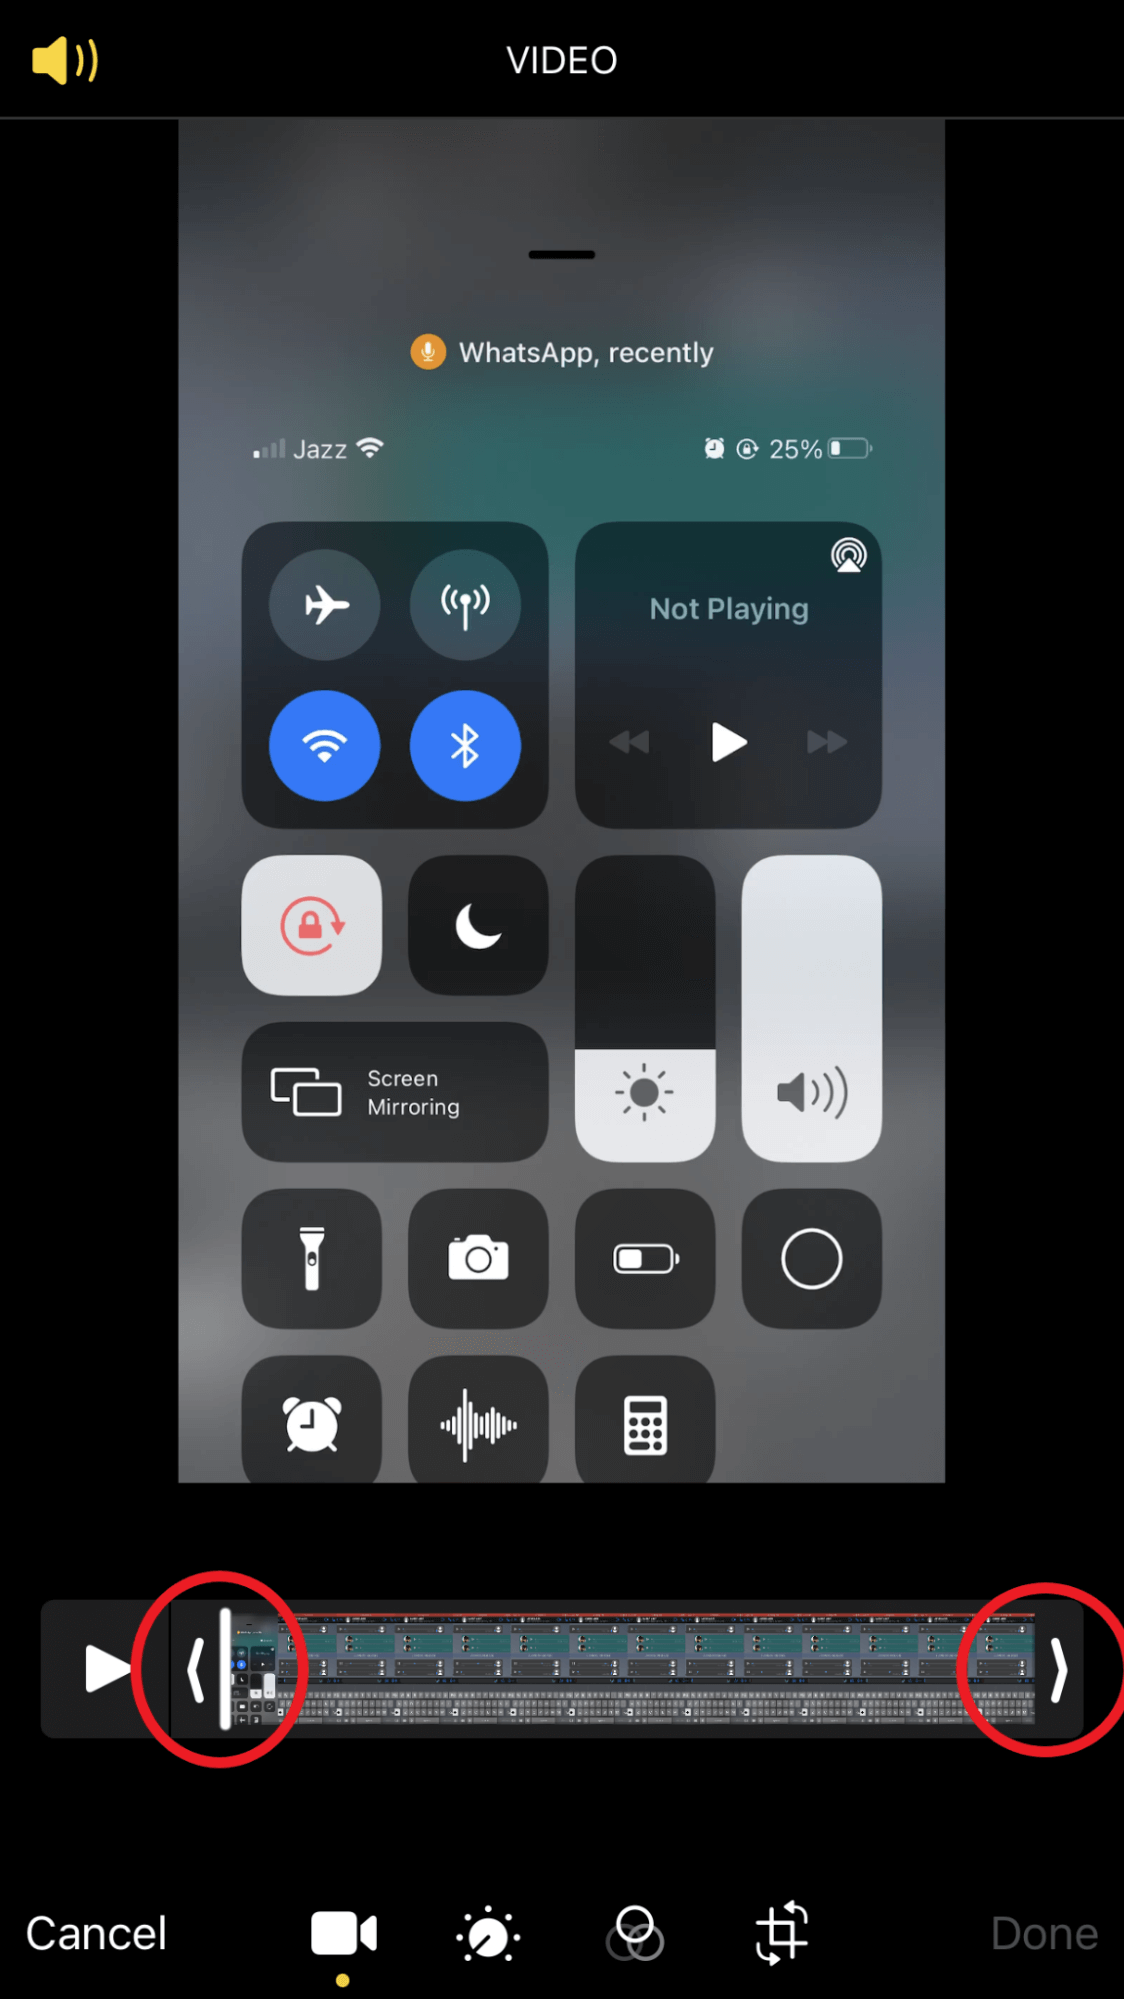
Step 4: Once you’re done, tap Done, and it will save the video into your gallery.
How to Crop Screen Recordings on iPhone 12
If you want to crop out a part of your screen from the recorded video, here are some easy steps:
Step 1: Select the recording you want to crop from your Photos app and press Edit.
Step 2: Select the Crop icon present at the bottom. 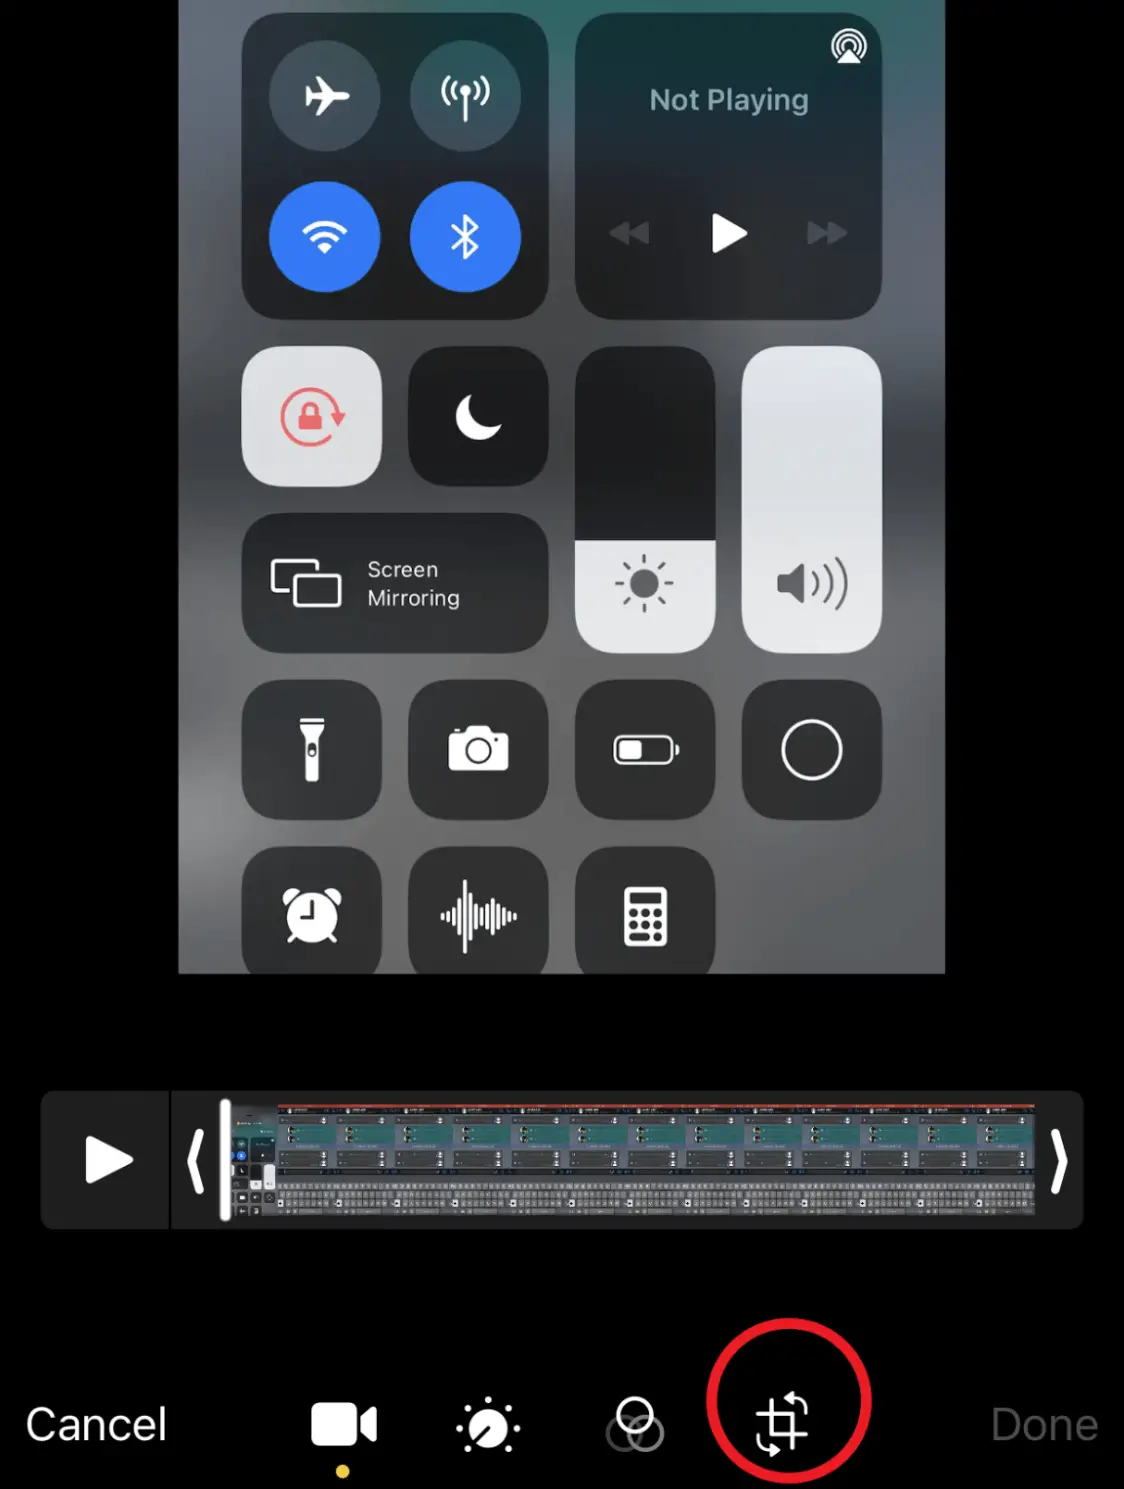
Step 3: A resizable box will appear around your video that you can drag to crop the screen recording.
Step 4: Once you’re done, tap Done, and it will save the cropped screen recording into your gallery.
Add Filters to Screen Recording
Following the same steps, you can also add filters to your screen recording. Locate the screen recording in your gallery and press Edit.
Below, you’ll find a list of ways to edit your video. Click the icon with the three circles, and it will display a range of filters you can apply to your video.
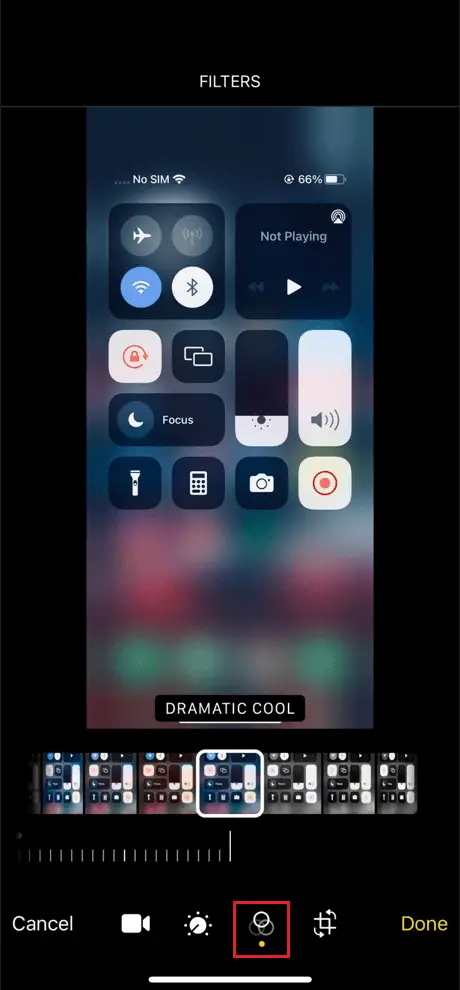
After you select one, simply click on Done to save the video.
Limitations of Screen Recording on iPhone 12
One major limitation of screen recording on iPhone 12 is the time restriction. Although Apple hasn’t specified the time limit for screen recording, it depends on the amount of free space on your iPhone’s hard drive, which, in most cases, isn’t always enough for long recording sessions.
If you’re running low on storage, your screen recording can stop unexpectedly without you knowing.
Another limitation of screen recording on iPhone 12 is that you don’t have too many video-editing features. Apart from basic trimming, cropping, and a couple of visual filters, you don’t get any extra perks.
You’ll have to use third-party screen recording tools for advanced image editing and reordering certain sections.
Third-Party Screen Recording Apps for iPhone 12
Apple has made it pretty simple to record your iPhone’s screen, but what if you want more screen recording features? Well, you can download several third-party screen recording applications from the App Store to enjoy extra features and edit your recordings in style.
Here are the three best screen recorder applications we recommend for the iPhone 12.
Record It!
Record It! is light yet professional application that thrives in recording screen and audio activities. The application allows you to record anything that appears on your iPhone’s screen in high-quality. Some of its features include:
- Recording the screen in any size, including partial screen or single-app window.
- Capture the screen as a high-quality video, from 720p to 4k.
- No time restrictions.
- You can record using your front camera as well.
For a detailed explanation of how to set up Record It! App on your iPhone and PC, you can watch this video:
QuickTime Player
If you’re looking to create a video tutorial of an app on your iPhone 12, QuickTime Player should be your go-to screen recording tool.
How to Screen Record Using QuickTime Player
Before starting, it’s important to note that you’ll need a Mac and an iPhone cable to use this application.
Step 1: Use the lightning cord to connect your iPhone 12 to your Mac. A pop-up message on your iPhone will appear asking you to “Trust This Computer?” press Trust to proceed further.
Step 2: Launch the QuickTime player on your Mac. In the upper right corner, press the Spotlight Search button, type QuickTime, then double-tap the first result that appears.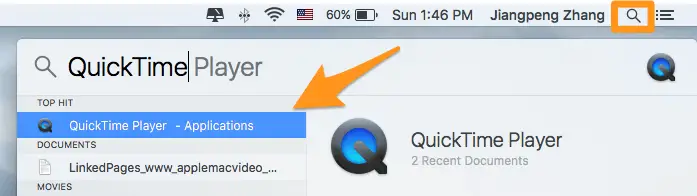
Step 3: At the top left corner, go to File, then choose New Movie Recording.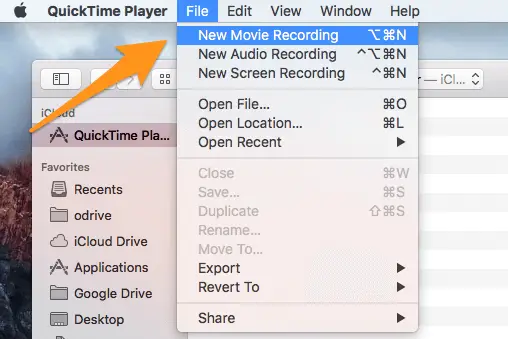
Step 4: Click the movie recording tab. There will be a tiny arrow icon next to the red circle. Click on it and select your iPhone’s name. You can also choose the microphone for voiceover or change the video quality.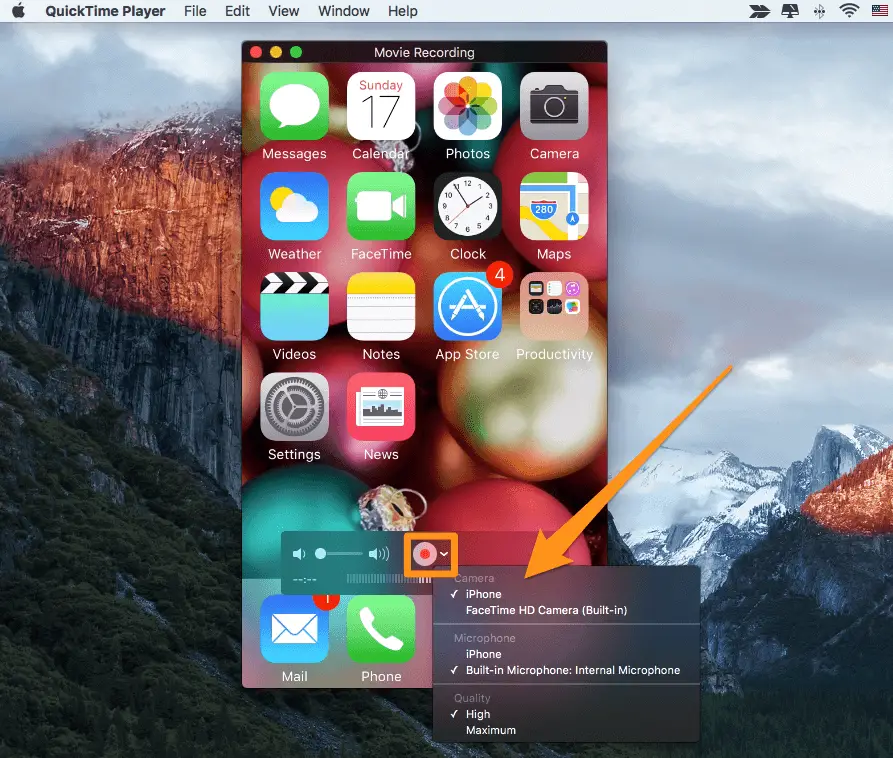
Step 5: To begin the recording, click the red circle icon. This will allow the screen recording to start. You also need to press the red circle icon to end the procedure when you’re done. Remember to save the screen recording by clicking on File → Save.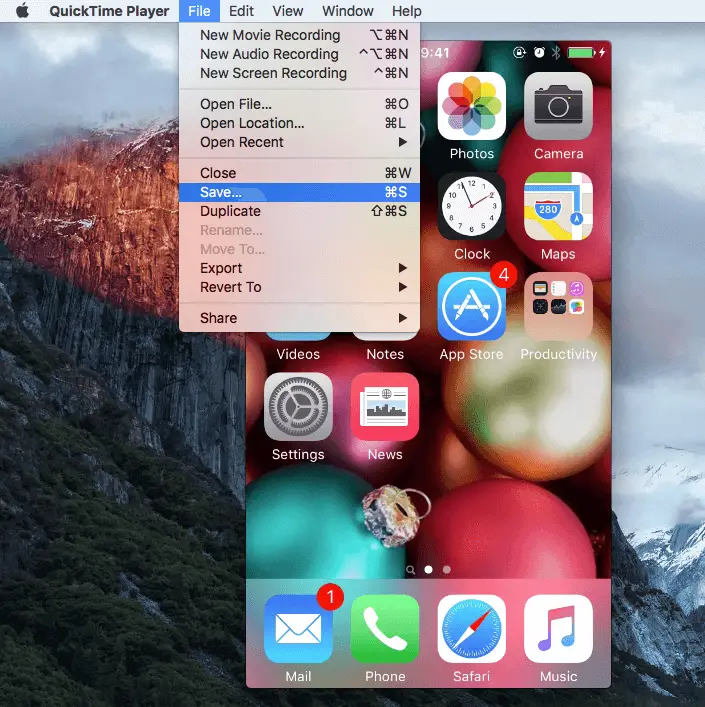
ScreenFlow
Like QuickTime Player, ScreenFlow is a great screen recording tool that allows you to record your iOS devices by connecting them to your Mac using a USB cable. However, the procedure is a bit tricky if you’re a first-timer.
How to Screen Record iPhone 12 Using ScreenFlow
Here’s how you can use ScreenFlow with your iPhone 12 and Mac:
Step 1: First, download ScreenFlow on your Mac. Then, using the USB cable, connect your iPhone with the Mac.
Step 2: Start the software and choose New Recording. Then, select the choices you like.
For example, if you only want to record the screen of your iPhone, you can simply tick Record Screen from [device name] and Record Audio from (optional). 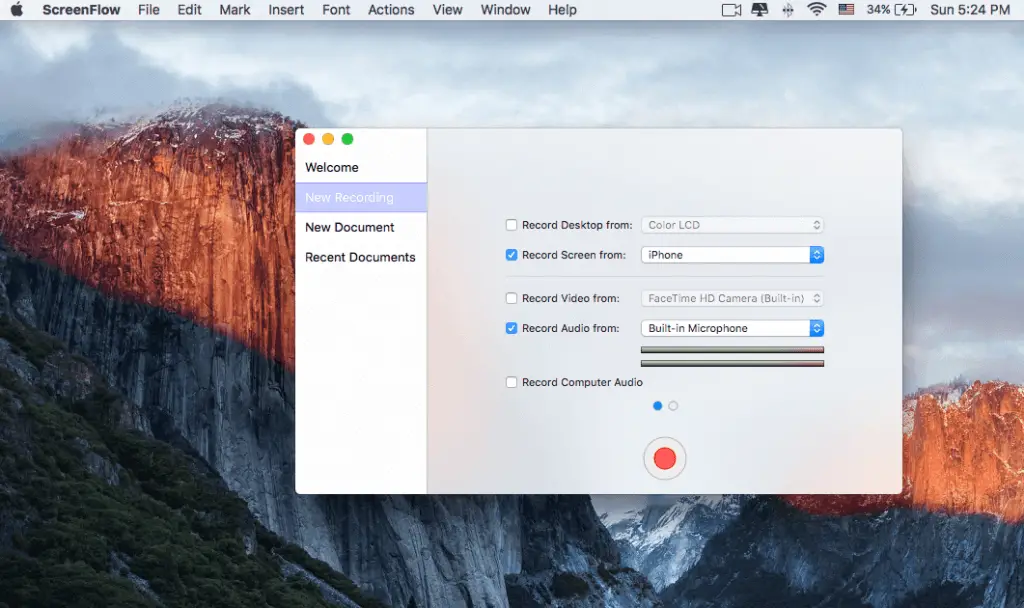
Step 3: Press the red circle button icon to start the recording.
Step 4: Now comes the tricky part. ScreenFlow will begin automatically without your knowledge. If you want to pause the recording, press Command + Shift + 2 on your Mac.
The video will be saved on your Mac, where you can edit it however you want to. Editing features in ScreenFlow include cutting and dragging certain components, adding callouts, changing the transparency, and a lot more!
Final Thoughts
While screen recording in iPhone 12 is a relatively easy task, it’s not recommended if you want to make in-depth tutorials or videos requiring extensive edits. Alternatively, you can use a handful of third-party applications to avail extra editing features and get the job done more efficiently.
We hope you enjoyed the article and understood the basics of screen recording on your iPhone. If you still have questions, feel free to ask them below!